Few things are as frustrating as reaching for your warmer, only to find it’s not heating up. Whether it’s a baby bottle warmer, a food warmer, or another small appliance, a malfunctioning heating element can disrupt your daily routine. With over a decade of hands-on experience in appliance repair, particularly with warming devices, I’ve seen countless heating elements fail and know exactly what it takes to bring them back to life. This guide will walk you through troubleshooting, diagnosing, and ultimately showing you how to repair a broken warmer heating element with confidence and safety.
Understanding Your Warmer’s Heating Element
At its core, a heating element is a vital component that transforms electrical energy into thermal energy, providing the warmth your appliance needs. Most heating elements consist of a resistive wire, often made from a nickel-chromium alloy called nichrome, which heats up as electricity flows through it. This wire is typically encased in a protective sheath, often with ceramic insulation, to ensure durability and safety. You’ll find these essential components in various warmers, from the coils in electric stoves to the submerged elements in water heaters and the discreet elements within baby bottle warmers or food warmers.
Signs Your Heating Element is Broken or Failing
Identifying the symptoms of a failing heating element is the first step toward a successful repair. Recognizing these common indicators can help you pinpoint the problem quickly and prevent further damage.
No Heat or Inconsistent Warmth
|
Our Picks for the Best Milk warmer in 2026
As an Amazon Associate I earn from qualifying purchases.
|
||
| Num | Product | Action |
|---|---|---|
| 1 | Gevi Milk Frother,5 in 1 Stainless Steel Professional Milk Steamer,Easy to Clean Hot Chocolate Maker,for Hot and Cold Milk Frother for Latte,Macchiato,Cappuccino and Hot Chocolate |

|
| 2 | Bottle Warmer, Grownsy 8-in-1 Fast Baby Bottle Warmer with Timer, Safe for Breastmilk Nutrients, Accurate Temperature Control, with Defrost, Sterili-zing, Keep Warm, Heats Baby Food & Bottles |
|
| 3 | Momcozy Baby Bottle Warmer for Breast Milk Formula Food, Fullest Nutrients Preserved, Fast Heat, Night Light for Nighttime Breastfeeding, One-Touch Easy Use, Newborn Essentials Supplies Gift for Mom |
|
| 4 | SIMPLETASTE Milk Frother, 4-in-1 Electric Milk Frother and Steamer, Automatic Warm and Cold Foam Maker and Milk Warmer for Latte, Cappuccinos, Dark Blue |
|
| 5 | SIMPLETASTE Milk Frother, 4-in-1 Electric Milk Steamer, Automatic Warm and Cold Foam Maker and Milk Warmer for Latte, Cappuccinos, Macchiato |
|
| 6 | Milk Frother, 4-in-1 Electric Milk Steamer, 350ml/11.8oz Automatic Frother Machine for Coffee, Warm and Cold Foam, Temperature Control for Latte, Cappuccino, Hot Chocolate |
|
| 7 | Philips Avent Premium Fast Bottle Warmer, with Smart Temperature Control, Water Bath Technology, Automatic Shut-Off, Model SCF358 |
|
| 8 | Momcozy Portable Bottle Warmer for Travel – Dual Heating Modes for Breast Milk & Water, Portable Milk Warmer with Fast Heating & Long Battery Life, 17 Ounces Large Capacity, Purple |
|
| 9 | Momcozy Portable Bottle Warmer for Travel – Dual Heating Modes for Breast Milk & Water, Portable Milk Warmer with Fast Heating & Long Battery Life, 17 Ounces Large Capacity to Meet Your All-Day Needs |
|
| 10 | Baby Brezza New and Improved Formula Pro Advanced Formula Dispenser Machine - Automatically Mix a Warm Formula Bottle Instantly - Easily Make Bottle with Automatic Powder Blending, White |
|
The most obvious sign of a problem is a complete lack of heat or uneven heating. If your warmer turns on but fails to reach the desired temperature, or if certain areas remain cold, it strongly suggests the heating element is compromised. This can indicate an open circuit where the electrical path is broken, preventing current flow.
Visible Damage
A visual inspection can often reveal conclusive evidence of a faulty element. Look for physical signs of wear and tear, such as cracks, blisters, or breaks in the element’s surface. A “melted” appearance or severe discoloration can also indicate an internal short or an electrical fault that has caused localized overheating. These physical damages often mean the element can no longer conduct electricity effectively.
Strange Noises or Burning Smells
Unusual sounds like buzzing, humming, or rattling from the warmer might point to loose or damaged components within the heating element. Similarly, a burning smell, especially a metallic or electrical odor, is a serious red flag. This scent can signify overheating, insulation breakdown, or a short circuit within the element itself, demanding immediate attention.
Tripping Circuit Breakers
If your warmer causes your circuit breaker to trip frequently, it could be a sign of a severe electrical fault within the heating element. A short circuit, where electricity takes an unintended path, can draw excessive current, overloading the circuit and triggering the breaker as a safety mechanism. This symptom requires immediate investigation to prevent fire hazards.
Safety First: Essential Precautions Before Any Repair
Working with electrical appliances can be dangerous if proper precautions are not followed. Prioritizing safety is paramount to prevent electrical shocks, burns, or further damage to your appliance. Always approach repairs with caution and diligence.
“Safety is not an option; it’s a prerequisite. Always disconnect power and verify before touching anything inside an electrical appliance.” – Admin, reviewxoo.com
First and foremost, disconnect the power supply to the warmer. This means unplugging it from the wall outlet or, for hardwired appliances, switching off the corresponding circuit breaker in your home’s electrical panel. Allow the appliance ample time to cool down completely before you begin any work, as heating elements retain residual heat.
Wear protective gear such as insulated gloves and safety goggles to shield yourself from potential electrical hazards or sharp edges during disassembly. Use only insulated tools specifically designed for electrical work, as their non-conductive handles provide an extra layer of protection. Ensure you work in a well-ventilated area to dissipate any fumes that might be released from damaged components. Finally, always consult your warmer’s user manual or service diagram if available; it can provide specific instructions and warnings pertinent to your model.
Tools You’ll Need for the Repair
Having the right tools on hand makes the repair process smoother and safer. For most heating element repairs, you’ll need a basic set of hand tools and a multimeter.
- Multimeter: An indispensable tool for testing electrical properties like voltage, current, and resistance. Essential for diagnosing element functionality.
- Screwdriver Set: You’ll likely encounter various screw types (Phillips, flathead, Torx), so a comprehensive set is beneficial for disassembling the warmer.
- Pliers: Needle-nose pliers are useful for gripping small wires and components, while cutting pliers can help with wire modifications if necessary.
- Wire Cutters/Strippers: If you need to replace or splice wires (though splicing is generally a temporary fix for specific element types and often not recommended), these tools are essential.
- (Optional) Heat-Resistant Gloves: While the unit should be cool, these can offer additional protection when handling components that might have been hot recently.
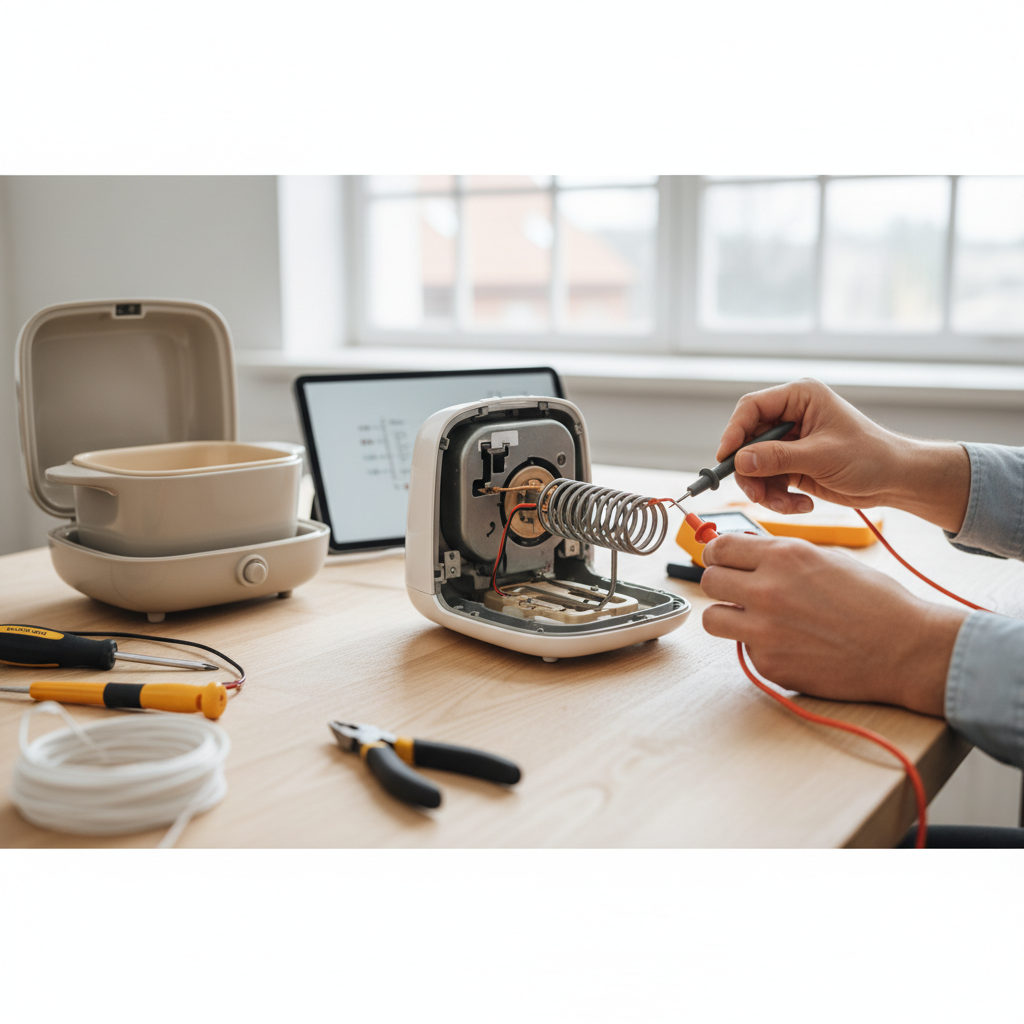
Diagnosing the Problem: Testing the Heating Element
Once you’ve taken all safety precautions and gathered your tools, the next critical step is accurately diagnosing the heating element. This involves a visual check and then using a multimeter to confirm electrical continuity.
Visual Inspection
Begin by carefully inspecting the heating element for any obvious signs of damage, as described earlier. Look for:
- Cracks, breaks, or bulges: These are clear indicators of a compromised element.
- Discoloration or “burn marks”: Excessive heat can leave scorch marks, suggesting a localized failure point.
- Corrosion or rust: Exposure to moisture can degrade the element over time.
Using a Multimeter
The multimeter is your most reliable tool for diagnosing an electrical fault in the heating element.
- Set Your Multimeter: Turn the dial on your multimeter to the resistance (ohms Ω) setting. If it’s an auto-ranging meter, it will adjust automatically; otherwise, select a suitable range (e.g., 200 ohms).
- Disconnect the Element Wires: Before testing, always disconnect the electrical wires leading to the heating element terminals. This ensures accurate readings by isolating the element from the rest of the appliance’s circuit.
- Test for Continuity/Resistance: Place one probe of the multimeter firmly on each terminal of the heating element.
- Normal Reading: A healthy heating element should show a resistance reading, typically between 10 to 50 ohms for most small appliance elements. (Always consult your appliance’s manual for specific values, as they can vary). This indicates continuity, meaning electricity can flow through it.
- Very Low or Zero Ohms: If the reading is very low or close to zero, it suggests a short circuit within the element. This means the current is bypassing the resistive wire, leading to malfunction.
- Infinite Resistance (“OL” or “1”): An “OL” (Over Limit) or “1” (infinite resistance) reading on a digital multimeter indicates an open circuit. This is the clearest sign of a broken heating element, meaning the internal wire has fractured, preventing any current flow.
- Test for Continuity to Ground (Optional but Recommended): While the probes are still connected to the element, touch one probe to a metal part of the warmer’s casing (assuming it’s grounded). There should be no continuity (infinite resistance/OL) between the element terminals and the casing. If there is, it indicates a dangerous short to ground, which could trip breakers or pose an electrocution risk.
Step-by-Step Guide: Replacing a Broken Heating Element
Once you’ve confirmed the heating element is faulty, replacing it is often the most effective and safest solution. Follow these steps carefully to install a new element.
Accessing the Element
- Disassembly: Carefully open the warmer by removing any outer panels, screws, or clips. The design varies greatly between appliances, so proceed slowly and methodically. Keep screws and small parts organized to simplify reassembly.
- Locate the Element: Identify the heating element within the appliance. It will usually be a coil or a metal tube assembly positioned where heat generation is required.
Disconnecting the Old Element
- Photograph Wiring: Before disconnecting anything, take clear photos of the wiring connections. This serves as a crucial reference for reconnecting the new element correctly.
- Label Wires: If the wiring is complex, use small pieces of masking tape to label each wire and its corresponding terminal.
- Detach Connections: Carefully pull or unscrew the electrical connectors from the terminals of the faulty heating element. Be gentle to avoid damaging the wires or other components.
Removing the Faulty Element
- Unscrew/Unclip Fasteners: The heating element is typically held in place by screws, nuts, or clips. Use the appropriate screwdriver or wrench to remove these fasteners.
- Gently Remove: Carefully extract the old heating element from its housing. If it’s stuck, check for any overlooked fasteners or gentle persuasion might be needed.
Installing the New Element
- Ensure Compatibility: Before installation, verify that your new heating element is the correct replacement part for your specific warmer model. Check the model number and specifications.
- Insert New Element: Carefully place the new heating element into the housing, aligning it with the fastener points.
- Secure Fasteners: Fasten the new element securely using the screws, nuts, or clips you removed earlier. Ensure it’s stable and properly seated.
- Reconnect Wires: Refer to your photos and labels, then carefully reconnect the electrical wires to the terminals of the new heating element. Ensure all connections are tight and secure.
Reassembly and Final Test
- Reassemble: Carefully put all the removed panels and covers back onto the warmer, ensuring all screws and clips are tightened.
- Test Functionality: Plug the warmer back into the power outlet or switch on the circuit breaker. Turn on the appliance and monitor it closely to ensure it heats up properly and functions as expected. Listen for any unusual noises and check for any burning smells during the initial test.
Maintaining Your Warmer to Prevent Future Element Breakdowns
Proactive maintenance can significantly extend the lifespan of your warmer’s heating element and prevent premature failures. Simple habits can save you time and money on future repairs.
- Regular Cleaning: Mineral buildup from hard water or food spills can insulate the heating element, causing it to overheat and fail. Regularly clean your warmer according to the manufacturer’s instructions, especially components exposed to water.
- Avoid Dry Operation: For warmers that use water (like bottle warmers or humidifiers), always ensure there is an adequate amount of water before operation. Running elements dry can quickly lead to overheating and burnout.
- Proper Handling: Physical impacts or rough handling can damage the fragile internal components of the heating element. Handle your warmer with care to prevent accidental breakage.
- Check Connections Periodically: If accessible, periodically inspect electrical connections for any signs of loosening or corrosion, which can lead to poor contact and overheating.
When to Call a Professional or Consider Replacement
While many heating element repairs are DIY-friendly, there are situations where calling a qualified professional or replacing the entire unit is the wisest course of action.
If you are unsure about working with electricity or feel uncomfortable at any point during the repair process, it’s always best to stop and seek expert help. Complex disassembly or intricate wiring, especially in high-voltage appliances, can pose significant safety risks.
Consider the cost of repair versus a new unit. If the replacement heating element is expensive, or if your warmer is old and other components are also showing signs of wear, investing in a new, more efficient appliance might be more economical in the long run. If, after your best efforts, safety concerns remain (e.g., persistent burning smells, tripping breakers), do not use the appliance and consult a professional immediately.
Conclusion
A broken heating element doesn’t necessarily mean the end for your favorite warmer. By understanding the common signs of failure, adhering strictly to safety protocols, and following a methodical approach to diagnosis and replacement, you can often restore your appliance to full working order. Equipping yourself with the right knowledge and tools empowers you to tackle these common issues, extending the life of your devices and ensuring they continue to provide reliable warmth. Remember, a little proactive care goes a long way in keeping your appliances running smoothly. What steps will you take today to ensure your warmer’s heating element stays in top condition?
Frequently Asked Questions
How long do heating elements typically last?
The lifespan of a heating element varies depending on usage, appliance type, and maintenance, but generally ranges from 5 to 10 years. Frequent use, hard water exposure, and physical stress can shorten this lifespan, while proper care and cleaning can help extend it.
Can I repair a broken heating element wire (splicing)?
While it’s technically possible to splice a broken nichrome wire in some elements, it’s generally not recommended for long-term safety or optimal performance. Splicing can create weak points, alter resistance, and potentially lead to uneven heating or future breakdowns. Replacing the entire element is almost always the safer and more reliable solution.
What does “OL” mean on a multimeter when testing a heating element?
“OL” on a digital multimeter stands for “Over Limit” or “Open Line,” indicating infinite resistance. When testing a heating element, an “OL” reading means there is a complete break in the internal wire, preventing any electrical current from flowing through it. This confirms the element is broken and needs replacement.
How do I find the correct replacement heating element?
To find the correct replacement, you’ll need your warmer’s exact model number, which is usually found on a label on the underside or back of the appliance. With this information, you can search online, contact the manufacturer, or visit an appliance parts store to ensure you get a compatible heating element designed for your specific model.
Is it always safe to replace a heating element myself?
Replacing a heating element can be safe if you follow all safety precautions, have the right tools, and feel comfortable with basic electrical work. However, if the appliance is complex, high-voltage, or if you have any doubts about your ability to perform the repair safely, it is always best to consult a qualified appliance technician. Your safety should be the top priority.